Recently I've been in the need of publishing a private package. "How so?" you might ask. Another weird use-case of mine of course! Basically I had a set of helper functions that I needed to use both inside my project's core code but also with its related lambda functions. Those lambda would then be deployed on Netlify (because I still don't know how to use AWS Lambda directly, but that's fine), and if you're familiar with Netlify's functions you might know that once in production they aren't aware of anything outside their directory, so using something like this wouldn't work in production (but works with netlify dev locally which is misleading):
project/
├── functions/ # require("../helpers"); won't work in production
├── helpers/
└── src/
One of the cool things with Netlify's functions though is that they are aware of project's dependencies! So my idea was to actually turn this helpers folder into a proper package, install it as a project dependency, and then both my source code and functions would have access to its content:
project/
├── functions/ # 3. require("helpers"); now work in production (ノ◕ヮ◕)ノ*:・゚✧
├── helpers/
│   └── package.json # 1. helpers is made a proper package
├── src/
└── package.json # 2. helpers is then installed as a project dependency
Now that I had that figured out I needed to publish this package, and as a private one for two reasons:
- Those helpers were really specific to that project, I don't see how I or anyone else would have used them in another project;
- This project was closed source, so it didn't make sense to have this part only opened to public.
And here we go, that's how I started to look for a way to publish this package as a private one. At first, I checked npm registry, of course, but this is a feature available on their paid plans only and I didn't want to pay $7 per month just to host one package privately. So I looked at GitHub which I knew started to offer a package feature last year, discovered that it comes with 500 MB of free private packages for everyone, more than needed, and that's basically how I went the GitHub Packages way, and why you're now to read this blog post~
OK, I'm done telling everyone my life, let's see how to actually publish a private package on GitHub's registry...
Preparing a Package
Well, as obvious as it sounds we need a package to publish in order to... publish it. Just make sure you have one already or create a dummy one if you just want to test it for yourself. You should have a package.json file with at least those two keys:
{
  "name": "helpers",
  "version": "1.0.0"
}
This is already enough if we want to publish our package to npm as long as its name is available (spoiler alert, helpers is taken), but we have to update few things in order to have it published on GitHub's registry instead of npm's.
First, we need to tell npm: "Oh, wait, this one is going to GitHub's registry." To do so there's the handy publishConfig key that allows us to configure such behavior directly inside our package.json, see by yourself:
{
  "name": "helpers",
  "version": "1.0.0",
  "publishConfig": {
    "registry": "https://npm.pkg.github.com" // This is GitHub's registry endpoint
  }
}
Then we need to specify the repository where this package's code is (or will be) living. GitHub requires it because it matches packages to repositories. Again here there's a repository key that we can configure inside our package.json file:
{
  "name": "helpers",
  "version": "1.0.0",
  "publishConfig": {
    "registry": "https://npm.pkg.github.com"
  },
  "repository": {
    "type": "git",
    "url": "ssh://git@github.com/lihbr/project.git" // A link to oour repository
    "directory": "helpers" // If oour package is not available at repository root
                           // add the path to it using this directory key~
  }
}
Voilà~ "We should be good with our package.json now?" Well, one last thing:
GitHub Packages only supports scoped npm packages. (GitHub's documentation)
What does that mean? A "scoped package" is a package with a name matching this format: @owner/name. Let's break it down quickly:
@is an identifier for scoped packages, they always start with this symbol;owneris either our account name or the name of an organization we're part of;nameis the desired name of the package, separated from previousownerwith a/.
Taking that into account let's update our package.json one last time:
{
  "name": "@lihbr/helpers", // `lihbr` being my account name here
  "version": "1.0.0",
  "publishConfig": {
    "registry": "https://npm.pkg.github.com"
  },
  "repository": {
    "type": "git",
    "url": "ssh://git@github.com/lihbr/project.git"
    "directory": "helpers"
  }
}
We're done preparing our package for being published on GitHub. Let's now see how to actually publish it.
Publishing our Package
OK, so everything is ready, let's run $ npm publish and...
npm ERR! code E401
npm ERR! Unable to authenticate, need: Basic realm="GitHub Package Registry"
Indeed, we forgot to authenticate to GitHub Packages! To do so need to get a personal access token. Here's how to get one:
- Head to GitHub and log in;
- Once logged in, click your profile picture at the top right of the screen, then "Settings";
- On the settings page pick "Developer settings" right at the bottom of the side navigation;
- Now pick "Personal access tokens" in the side navigation again.
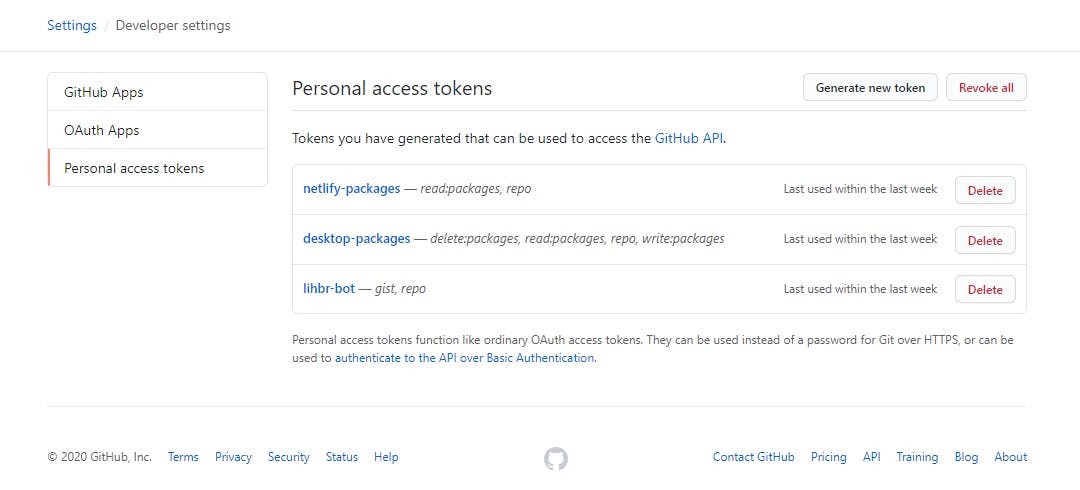
You should now be on a page like that, if logged in you can reach it directly through this link:

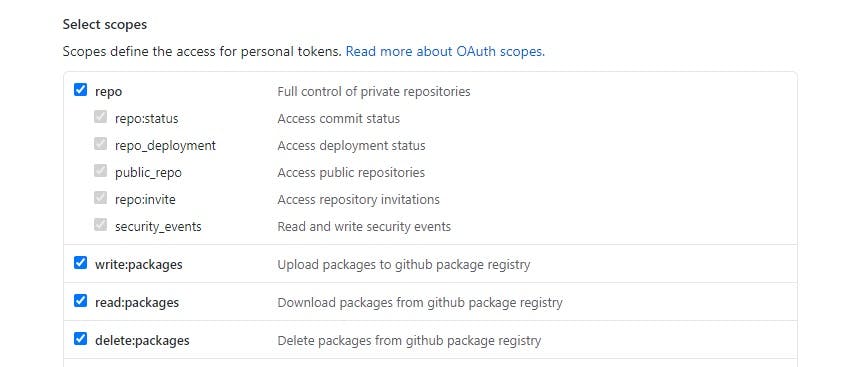
Click "Generate new token". I like to have one per machine or per service I'm using but it's up to you to manage them the way you like. Fill the "Note" field with something that can actually help us in the future figuring out where this token is being used, and pick at least the following scopes for usage with GitHub Packages:

We can then click "Generate token" at the bottom of the screen and GitHub will prompt us once the generated token. We better make sure to get it in our clipboard or we'll have to repeat the above process again.
Now that we have a personal access token we can authenticate to GitHub's registry with the $ npm login command like this:
$ npm login --registry=https://npm.pkg.github.com
> Username: # Your GitHub username
> Password: # The personal access token we just generated, NOT your GitHub password!
> Email: # A public email address
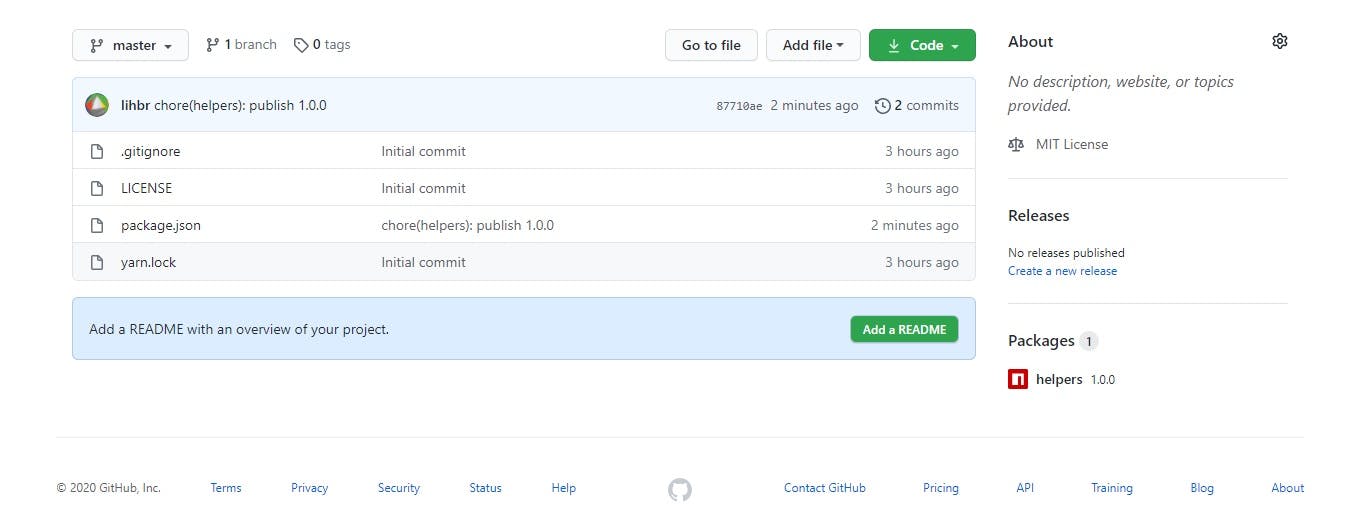
After we logged in let's try to run again the first $ npm publish command. If everything went well, we should see our newly published package from its source repository homepage (bottom of the sidebar):

Public or Private Package?
You might be wondering: "Hmm, I published my package, but is it publicly available?" With GitHub the answer is pretty simple: it depends on its related repository visibility. Public? Our package is public. Private? It's not. The only exception being if we publish our package when our repository is public and then switch it to private, in that case, our package will remain public to prevent breaking other projects depending on it, fair enough.
OK, so, so far we learned how to create and configure a package for GitHub Packages and how to actually publish it there, that's great! But the point of a package is actually to be able to install it...
Installing Packages From GitHub Packages
Again, here just throwing $ npm install @lihbr/helpers (using your package name of course) in our console won't work out of the box. We have to tell npm to actually fetch our packages published on GitHub from GitHub's registry and not npm's.
To do so npm (and Yarn) makes use of .npmrc files (more on them on npm's documentation), there's one already at our home directory and if we peek into it we should see our GitHub personal access token that we used before. Anyway, here we'll create another one at a project root where we want to use our new shiny package with the following content:
@lihbr:registry=https://npm.pkg.github.comSee that @lihbr? That's the scope of our package we defined before, replace it with yours obviously. Basically, this line is just telling npm "'Fetch every package with that scope on this registry instead of the default one", and if we have multiple packages with different scopes that we need to fetch from GitHub's registry (or other registries) we can just append other lines following the same pattern.
Once we have our .npmrc set up at a project root we should now be able to install our package locally, awesome! "But what about my CI now?" In case you were wondering if we need to version this .npmrc file, we definitely do because it'll allow us, our colleagues (yes, let's think about them also), and our CI, to clone our repository and benefit from its customized npm configuration, therefore allowing them to install our packages published on GitHub Packages. With that everything should work out of the box for them, almost...
Using GitHub Token Environment Variable
So far installing packages from GitHub locally has been working for us because we already logged in into its registry when we needed to publish our package first. Now we have to tell anyone or anything that wants to use our package to also authenticate to GitHub's registry. Let's see how to make sure that's always the case before installing our packages...
Here again, we'll make use of our .npmrc file at our project root, the one that is versioned. Let's add another line to it:
@lihbr:registry=https://npm.pkg.github.com
//npm.pkg.github.com/:_authToken=${GITHUB_TOKEN}
This new line will tell npm to authenticate to the given registry, here GitHub one, with the provided token, but we don't append our token directly in this file as it's a versioned one. To work that around we make use of the ${GITHUB_TOKEN} syntax which npm will interpolate and replace with the value of our GITHUB_TOKEN environment variable here, and now I'm pretty sure you start to see where this is all going...
For our CI let's head to its configuration, register another environment variable named GITHUB_TOKEN and give it the value of the personal access token we created before together (alternatively we can create another one just for our CI, with only read:packages as a scope). Now when we spin our CI it should be able to install our packages also, great!
Now for our coworkers and us, since we told npm to authenticate to a registry through an environment variable inside our .npmrc file at the project root, it now expects that GITHUB_TOKEN environment variable when developing locally too. Here's an example on how to set it on Windows, Mac, or Linux, just in case, but you're the boss regarding how you manage them on your OS of course:
# On Windows
$ setx GITHUB_TOKEN 9cecfe9470b9fa45fa08c866e0cf912c905e80d7
# On MacOS or Linux
$ echo "export GITHUB_TOKEN=9cecfe9470b9fa45fa08c866e0cf912c905e80d7" >> ~/.bash_profile
Again, we will also have to tell our colleagues to have that environment variable set with a token of them.
Summing Up
Well, that's all about it! We covered how to publish a public or private package to GitHub's registry, how to allow its installation on local and CI environments, as well as what are the involvement for our project configuration.
I hope that everything was clear enough, if not please reach out to me on Twitter! And in case you want to dig deeper into GitHub Packages here's a link to their official documentation~
Thanks for reading!